Gradebook setup and support
Prepare your classes, protect local records, and connect staff workstations.
Harborleaf Gradebook is coming soon for Windows. These guides introduce the workflows planned for the release.
Quick start
- Complete first-run setup and create the local Administrator account. Follow the recovery instructions for the verified release and keep any recovery material in an institution-approved restricted location.
- Use the Administrator Command Center to create faculty accounts and assign Admin, Teacher, or Staff roles.
- Add student profiles and case advisor assignments, then create class cohorts and course rosters.
- Configure the course syllabus, curriculum units, grading method, and attendance schedule before recording progress.
Connect staff workstations
- Create an on-premises shared folder, such as
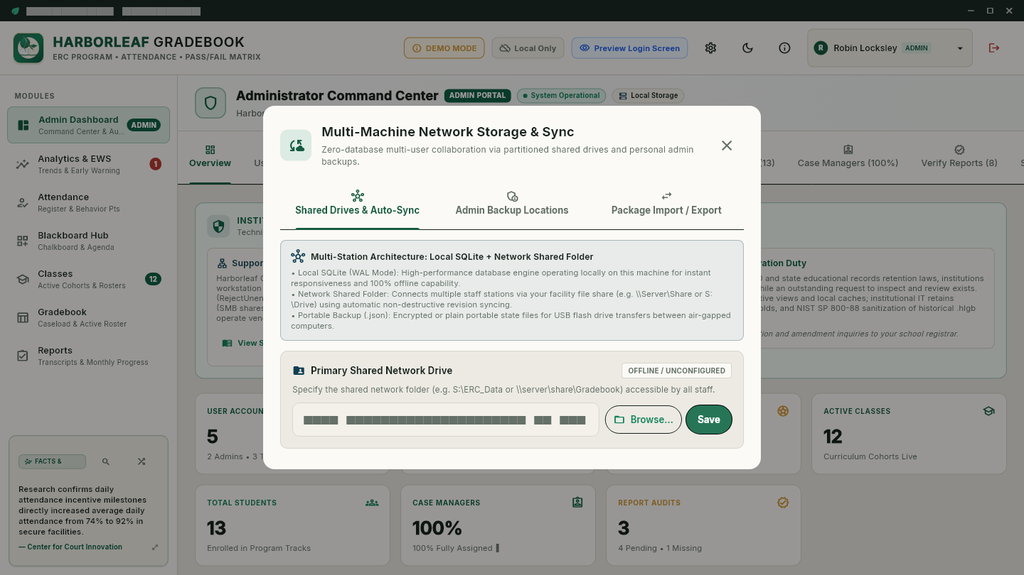
\\FacilityServer\GradebookShare\SyncData. Give authorized staff the required read and write permissions. - Open Multi-Machine Network Storage & Sync and choose Shared Drives & Auto-Sync.
- Set the Primary Shared Network Drive to the same folder on each station and save it. Approve any mirror destination separately; a mirrored folder is not a substitute for a tested backup.
- Follow the release-specific synchronization instructions and check connection status. Test with synthetic records before connecting production workstations.
For isolated workstations, use Package Import / Export to transfer a portable backup. Protect removable media as carefully as the original student records.
Backups and recovery
- Use the verified release’s backup or package export workflow. Confirm the resulting format and protection before moving the file; JSON snapshots must not be treated as encrypted archives.
- Store a separate copy in a location approved by your institution. Confirm backup locations and retention settings for your installed release.
- Before making a direct copy of
harborleaf_local.db, stop synchronization and close Gradebook cleanly on the source workstation. Use a supported consistent backup method; do not copy an active WAL database file on its own. - Before restoring, preserve the current data. Restore to an isolated test workstation first, then check student rosters, courses, attendance, and reports before resuming shared work. A stale backup or station may reintroduce deleted records; follow verified release guidance.
Keep backups, recovery keys, and exported records accessible only to authorized staff.
Generate academic transcripts
- Review the student profile, course completion, attendance, and graduation milestones.
- Open Reports and select the student and reporting period.
- Preview the transcript or monthly progress report. Check grades, completed hours, course milestones, and advisor sign-off.
- Export the PDF to an approved local folder or print to an authorized printer. Follow your institution’s rules when sharing student records.
Troubleshooting
Shared folder permission errors
Confirm that the folder is reachable from Windows and that the signed-in staff member can read and write files there. Check the saved path and network connection on each workstation.
File locks or sync conflicts
Pause synchronization and close other sessions before retrying. Preserve a backup before making changes. Avoid deleting database or lock files while any workstation is writing records.
Administrator password recovery
Follow the documented recovery procedure for your installed release. If recovery fails, contact support with the application version and sanitized error text. Never share passwords or recovery keys with support.
Contact support
Use the Horizon Tech Services inquiry form, select Other, and start your message with “Harborleaf Gradebook support.” Include your Windows version, Gradebook version, and the steps that led to the issue.
Do not send student records, transcripts, passwords, recovery keys, or backups. Remove personal information from any screenshots you share.